Replacing the SSD in a late-2015 Apple iMac
About a month ago, my iMac (Retina 5K, 27-inch, Late 2015) crashed very hard. It would no longer restart into anything but the recovery console. It seemed pretty clear that something was very corrupt and I found myself facing a system reinstall, at the very least.
Time Machine to the rescue
Since it’s a desktop, I have a backup drive attached to it at all times. Time Machine runs several times per day. My latest backup was from about ten minutes before the system crashed. I cannot stress how much of a killer feature this seemingly innocuous fact is. This feature alone is reason enough to switch to MacOS and its attendant suite of supporting applications.[1]
I had lost access to my work but I hadn’t actually lost any work. The way Time Machine is structured, I still had access to all of the files. I had also recently started using ProtonDrive more, so a lot of files were also available there as well. Things like “open browser tabs in Opera” were also technically available, in that I had the folder in Application Support but restoring that on another machine would have been more involved.
Initial restore
Instead, I immediately decided to restore from my latest Time Machine. I was lucky enough that the machine was rebooting directly into the recovery console because I didn’t quite remember how to get there.[2] It had been a long, long time since I had to even think about the recovery console. I was used to running my iMac for 90 days without rebooting, letting it go to sleep and deep sleep, so that it barely used any power.
From the recovery console, I started restoring … but was unable to find my drive. Even Disk Utility was unable to see the device. This had never been a problem before. I was left to assume that my SSD was no longer addressable. It had well and truly died.
While I would later learn that whether a drive is recognized by Disk Utility depends very much on the version of the system image from which the recovery console was launched. Once I’d finished the journey outlined below, I had a nagging suspicion that perhaps nothing was wrong with my SSD and that I’d simply booted into a recovery console that was—for whatever reason—suddenly unable to see the SSD.
This may sound unrealistic but you have to remember that this is a late-2015 machine—the hardware is almost ten years old—and is no longer supported by modern version of MacOS. The recovery console runs from an image tucked away somewhere in the on the boot volume. If the SSD is well-and-truly dead and no longer addressable, then that volume would also be inaccessible.
I still had the recovery volume and I could still see the drive, so I started the recovery process. But it never finished. I never even got out of the “Preparing…” phase. I waited for at least 45 minutes but online searches revealed that there was definitely something wrong with the destination drive. At this point, I hadn’t learned that the version of MacOS installed on the target drive matters, even if you’re using Time Machine to overwrite the entire system.[3]
The drive seemed shaky. I rebooted back to the recovery console, only to discovery that the SSD didn’t show up at all anymore. I obviously couldn’t restore to a drive that had stopped responding—nor would I want to restore to a drive that was appearing intermittently, and to which Time Machine had already failed to restore once.
It was time to replace the SSD.
Installing a new SSD in an old iMac
I’d done this once before, on a late-2007 iMac, sometime in the distant past. The only thing that I could remember is that (A) I’d ordered the kit from a company called OWC (Other World Computing) that had delivered (B) a perfect kit with all the parts and tools I needed to upgrade my SSD at that time.
Against all odds, OWC still exists and they are utterly unchanged. They are a professional establishment that has stood the test of time. Whereas you can find some of the parts on Amazon, I strongly recommend that you use the product-and-parts chooser at OWC to make sure you get exactly the right kit and the right parts. Their site also has extensive documentation that I leaned on heavily to accomplish what the site deemed an “advanced+” DIY task.
- The 23-minute installation video How to Upgrade or Install a PCIe SSD in a 27-inch Apple iMac with Retina 5K Display (Late 2014 − Mid 2015) (OWC (Other World Computing)) was perfect.
- The page How to Migrate Your Mac’s OS and Your Data to a New Drive (OWS (Other World Computing)) was also quite helpful for getting a drive configured to which I could actually install the OS that I had available.
Ditto for the PDF Formatting, OS Installation, and Migration Guide (OWC (Other World Computing)), which was essential for finally unknotting the problem of not being able to install an OS.
In particular, it noted that some “newer” SSDs could only be recognized by “newer” versions of MacOS. The original OS for my iMac was MacOS Sierra, which would not be able to see it. I had to make sure to boot into Catalina instead. On top of that, the documentation also noted that the SSD would only recognized if a particular update had already been applied.
“[…] macOS 10.13 High Sierra (or later OS) must be installed on the host computer BEFORE installing this SSD for the first time. These OS versions include an EFI firmware update for your Mac. Without the update, the computer will not recognize the SSD. This process is separate from and should precede the other processes described here. Note that when installing the OS onto the drive itself (later in this document), macOS 10.13 or later is also required.”However, applying that update can only be done from a running operating system so, if you’d never done it before your SSD died, then you were out of luck. Luckily, the update had appeared in High Sierra, which had come out in 2017, so my machine had long since had it.
OWC provided an end-to-end solution and took nearly all of the uncertainty out of the SSD-replacement. Since I was doing it anyway, I upgraded from a 512GB drive to a 1TB drive.
The installation went quite smoothly. There were two of us, so one person could carefully lift parts while the other unplugged cables. We had plenty of little containers to hold screws and my partner helpfully labeled everything as it was coming out. We were able to clean out what turned out to be a remarkably small amount of dust for 8.5 years of use.
See the iMac SSD Upgrade 2025 photo album for the full pictorial journey. I’ve included a few photos below.[4]
 The iMac screen is open. It's dusty in there.
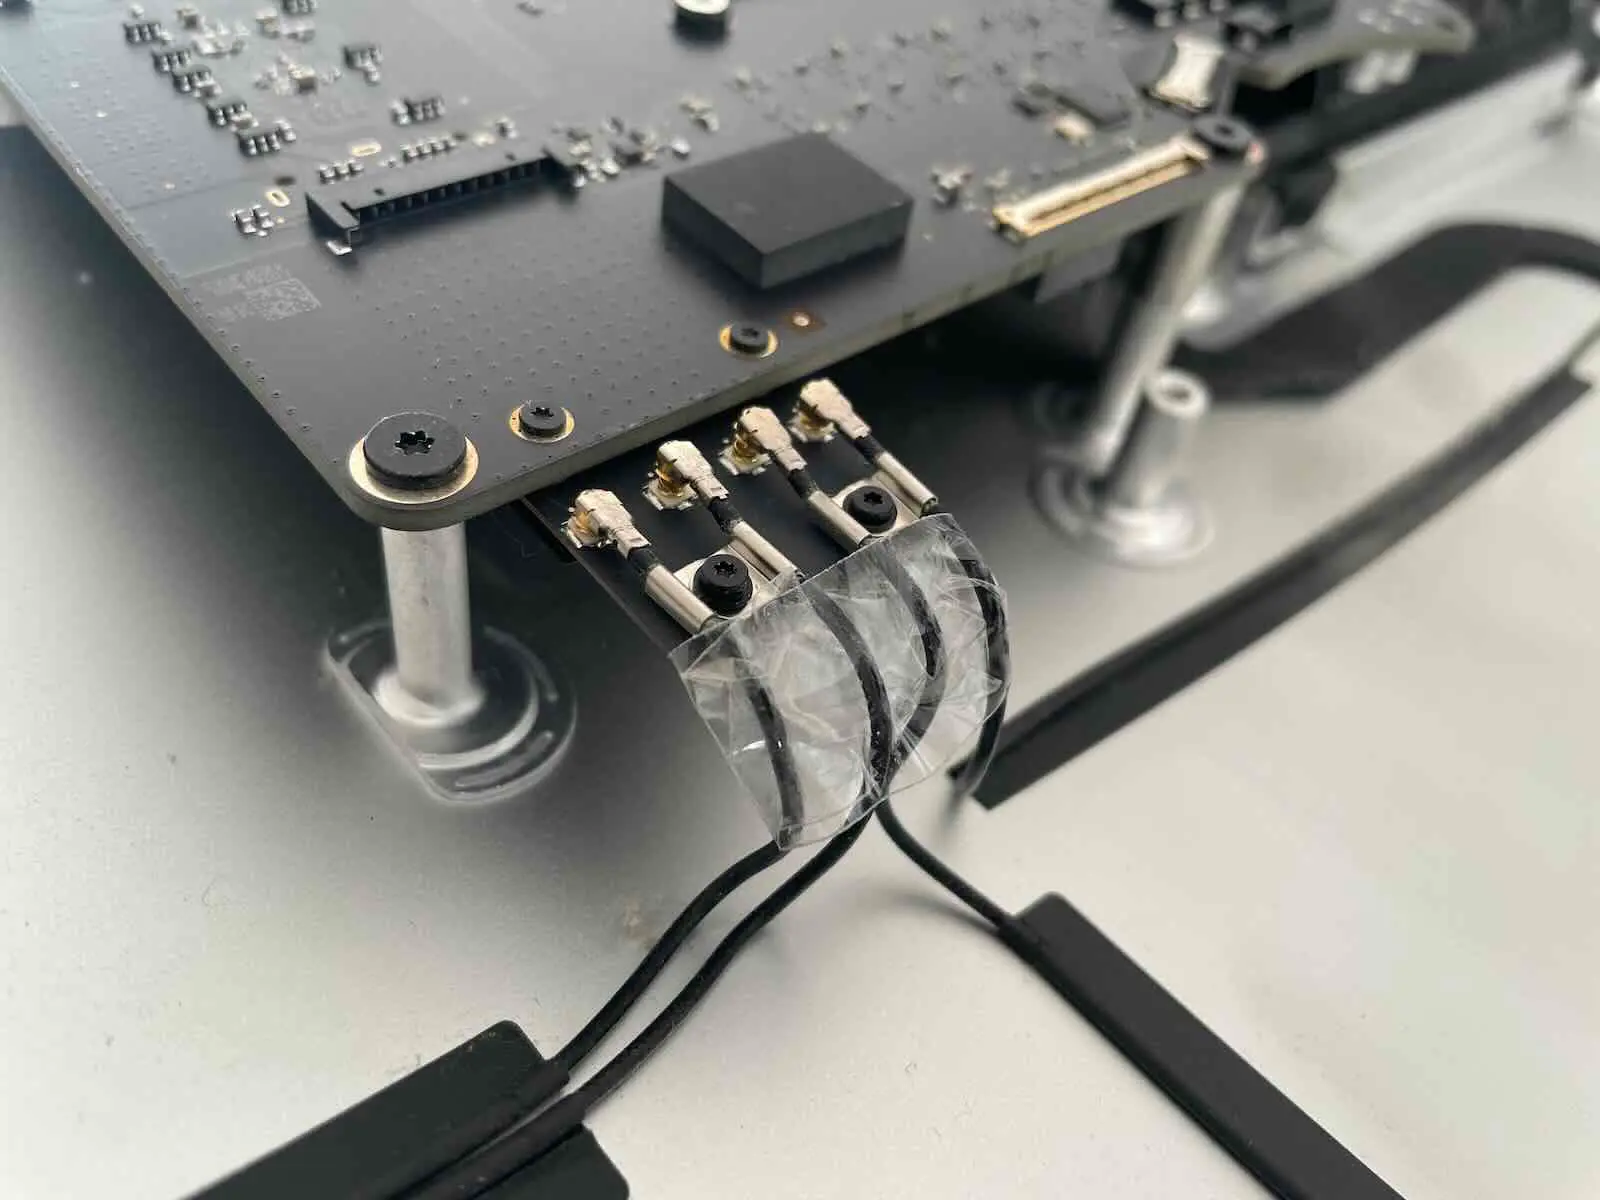 The wireless snap-on connectors
 Heat-sink screws near an almost dismantled Mac
 Winding the power-switch wire around the left speaker
There’s nothing more to add that OWC doesn’t already say. Just follow the instructions.
Make sure to note their warning at the end: try starting up the machine before you attach the screen with adhesive.
Since you’ve basically disconnected every wire in the machine, you’ll want to verify that—as much as you can—that wireless, BlueTooth, sound, video, and so on are still working.
- You can tell right away whether the display is connected correctly.
- The sound should play when the Mac boots
- The internet recovery will tell you if you have a wireless connection.
- The Disk Utility will tell you whether the SSD is recognized. (See above for a discussion about that.)
Installing MacOS and restoring
This part took longer than upgrading the hardware due to a combination of my inexperience, my not understanding how the recovery consoles relate OS version and startup modes, how old my Mac is, and the general opacity of the boot process on a Mac.
🙌🏼 At first, Disk Utility still couldn’t see the disk, but Erase and reformat a storage device in Disk Utility on Mac (Apple Support) and Internal SSD Not Detected (Apple Discussions) helped me figure that out and get a target drive to which I could restore my Time Machine backup.
With a brand-new SSD, you don’t have a recovery partition, so the Internet Recovery triggers automatically. This isn’t as reliable as I’d like, though. The Mac failed to download the base image twice, taking long minutes to do so.
✅ What ended up working for me was to plug in the Time Machine backup drive, so that recovery would use the base image from there instead of trying to download one. That base image also recognized the SSD immediately.
🤔 It’s a bit confusing because you have to boot from the right image to be able to see the disk, and then you have to actually initialize a volume on that disk in order to be able to restore or install to it.
- ⛔️ I tried restoring the most recent backup of MacOS 10.15 from Time Machine but it didn’t work. It managed to restore the entire drive—over the course of about six hours[5]—but then failed with an unrecoverable error security agent was unable to create requested mechanism builtin:prelogin (Apple Discussions). The backup seems to have been corrupted.
- ⛔️ I tried a slightly older version, trying to find one from before the hardware failure and corruption, but it was similarly unhappy. These are expensive experiments, each taking at least six hours.
- I changed tack and figured I would install a fresh operating system, then upgrade it, and restore just my user account.
- ⛔️ This did not work because 10.15 had already been partially installed and then the MacOS Catalina that is included in the base image of this old machine refused to upgrade it. The message was kind of confusing, though. “This source contains a newer release of macOS. Your Mac requires an upgrade before you can migrate from this source.” In hindsight, it makes sense.
- 😗 I found an oblique hint online—Can’t reinstall macOS from recovery mode, won’t allow me to select system disk (MacRumors), in which one of the comments wrote, “If you are not offered your disk for the install, you may need to erase your drive, then install.”—that helped me realize that the Time Machine recovery was bailing out because it was finding an aborted installation of a newer OS. It seems to be proceeding father now.
- Install (10 minutes)
- Auto-reboot; slow progress bar that doesn’t complete; black screen; ominous for 10 seconds; screen goes a lighter shade of black; it’s back
- Auto-reboot; slow progress bar again; bouncing around a bit but making progress. 11 minutes remaining…
- 💥 The machine still crashed a couple of times. I’m starting to suspect that it wasn’t the SSD causing problems, or not just the SSD. It might have even been just fine. I’m wondering whether I might need to run the Apple Diagnostics to test the other hardware. Let’s wait and see if the instability disappears with system upgrades.[6]
💪🏼 I managed to log back in, but Catalina is now refusing to connect to the Bluetooth keyboard and mouse (the mouse briefly but not at all consistently). I connected a USB mouse instead and could enable the onscreen keyboard to type in the password to approve the installation of Monterey.
 Upgrading to Monterey
- As with the installation of Catalina, the installation is a three-part process: install in Catalina; reboot to progress bar; reboot to another progress bar, which eventually indicates time remaining
- 🙌🏼 On installation of Monterey, things seem a bit more stable.[7]
- 🙌🏼 Instead of running a backup, I decided not to test whether Time Machine properly stores two machine backups on one drive.[8] Instead, I started the Migration Assistant and elected to copy the Applications and my user over. I didn’t copy the “other files”, since that’s just files from the root of the drive and it was only a few kilobytes. I also didn’t copy and system or network settings. Nor did I copy the Administrator user, since that’s just an empty user that I use for authorization. As before, it took six hours but it succeeded.
[1] I wrote about some of the many disappointments there are in Apple software, as well, in Apple’s continued decline in software quality.↩
[2]
Apple’s support pages explain quite a bit about how this process works but it also leaves many things open to interpretation. The page How to start up from macOS Recovery (Apple Support) is very useful and informative.
It explains that you can start from a local recovery partition by pressing and holding ⌘ + R until you see the Apple logo and a progress bar. If you instead see a spinning globe, then that means that you’ve triggered an Internet Recovery (which you can also force by pressing and holder ⌘ + ⌥ + R instead), which will download and run the image for the latest version of MacOS available for your hardware.
I didn’t end up trying to reset NVRAM on my Mac (Apple Support) because it didn’t seem like it would help. The page If your Mac starts up to a question mark (Apple Support) because it explains that you have to use Disk Utility to create a partition/image on which the boot-loader might search for an OS.
↩[3]
At one point, during a subsequent installation, I got the following error message.
 The source contains a newer release of macOS…
[4]
In the third photo, you can see that the old towel I used to protect the components has a monogrammed MBV on it. My mom got me that towel probably 35 years ago and it says MBV instead of MVB because U.S. companies then didn’t really understand people not having middle names but having a space in their last name. It was not straightforward to fill out the form and I ended up with a towel with someone else’s monogram on it.
In that picture, you can also see that I’m wearing a bracelet from Adirondack Crystalry. I have two of them, but I’d be hard-pressed to tell you which stones they have though. They were gifts from its proprietor, who’s an old, old friend.
↩[5] My backup drive is really, really slow. I’ve ordered a faster one now.↩
[6] I have one more day to order a 15%-off replacement … but I’m loath to move to a smaller iMac screen and don’t know if I’m ready for a Mac Mini + external Monitor instead (although that would be easier to upgrade and work with).↩
[7] I’ve only had crashes when the machine drops into deep sleep, which I can live with…in that I’ve been running
caffeinate in a Terminal for a week now and it’s been dead-steady. There isn’t a hardware problem, at any rate. I’ll figure out whether it’s sleep or deep sleep that causes problems later.↩[8] I only had one backup drive from my previous installation, so I was sensitive to losing that data to a misunderstanding of how Time Machine works. “Oops, I cleared the drive” wasn’t an option.↩